| 5. Drawing curves with the Drawpanel tool
|
|
Besides starting out with a primitive, you can also draw a
curve which then you can extrude into a NURBS object or sweep into a polyhedron.
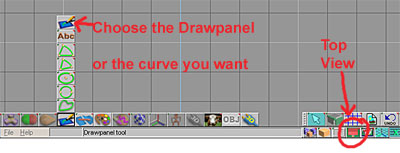
To draw a curve, you can either choose the kind of curve
you want to draw and start drawing, or click on the Drawpanel tool, and
click-and-drag in the scene to define the shape and size of the Drawpanel, then
start drawing your curve. It's best to use the Top View for drawing your shape
(Fig. 5.1). (If you want to close the curve, right-click on the first curve
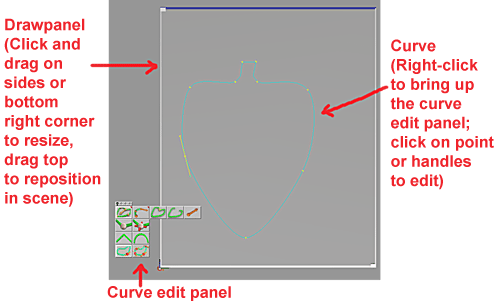
point or click on the "close curve" icon in the editing panel.) Once you've drawn your curve, you can edit it by right-clicking on
it (Fig. 5.2). When
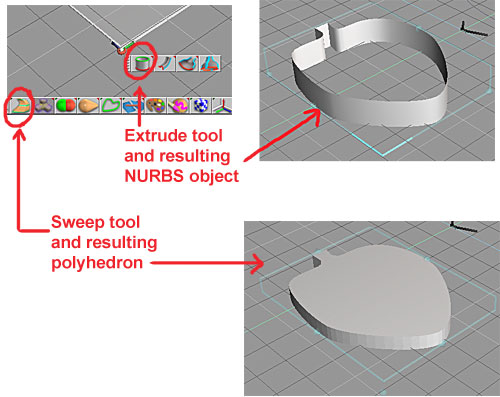
you're done editing and you're ready to extrude or sweep the shape, left-click
it, then choose the relevant tool. You might want to get into Perspective View
for this task. (Fig. 5.3)
|
|
 |
|
Fig. 5.1 |
|
|
|
Fig. 5.2 |
|
|
|
Fig. 5.3
|
| 6. Selecting faces/edges/vertices
|
| If you right-click on your object, you'll get into edit
mode. When the object edit panel first opens, it might be just one row of icons. Click on
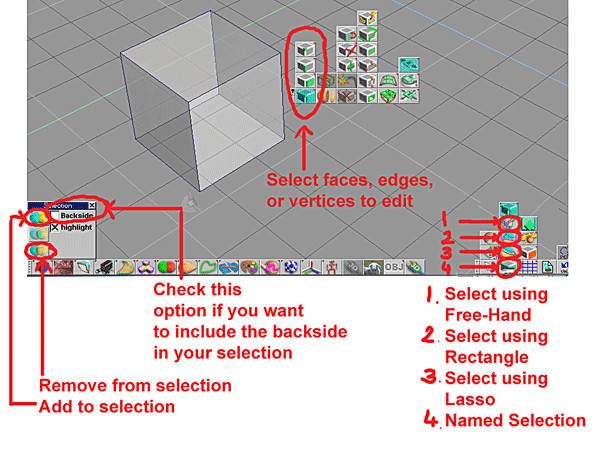
the handle to open up the whole panel. If your object is a polyhedron, you can select faces, edges or vertices of your
object, add edges or vertices, delete faces or vertices, etc. First select
whether you want to select faces, edges or vertices then start selecting. If
you want to add to your selection, then keep the CTRL key down while you keep
selecting. Or, go to one of the object selecting tools in the bottom right
toolbar, click on it, then right-click on it to bring up the options menu. Here,
you can select if you want to add to your selection or take away from your
selection. In tS6, these options are also in the object edit tools panel, so you
can check there if you want to add to or deduct from your selection. You can
also remove faces/edges/vertices from the selection by holding down the SHIFT
key and selecting. If in the options panel you have both the "Add to
selection" and "Remove from selection" option enabled, then tS
will add to or remove from your selection depending on the context. (Add if that
face/edge/vertix had not been selected yet, and remove if that face/edge/vertix
had already been selected.)
|
|
|
|
Fig. 6.1
|
|
You can select the faces/edges/ vertices one by one, or
you can use the rectangle select, the lasso select or the freehand select tool. With the rectangle
select, you just draw a rectangle around the area you want to select. With the
lasso select tool, you draw around the area you want to select. With the
freehand select tool, you select areas as if you were painting on your object.
In the options window you can choose if you want to have the backside included in
your selection, too. For example, if you want to select all the faces of an
object, you would first select the face select tool, then the rectangle
select tool, enable the backside option, and draw a rectangle around your
object.
You can save your selection so that you can access it any
time by using the "named selection" tool. To use it, first select the
area you want, then click on this tool. An options window will pop up. Click on
the "Add" button, then click on "Sel" in the text window and
type in a name for your selection then hit the "Enter" key on your
keyboard. Now, if you want to get back your selection, then select your object, open
the "named selection" tool, click on the little arrow and select the name from the
drop-down list. (Fig. 6.1)
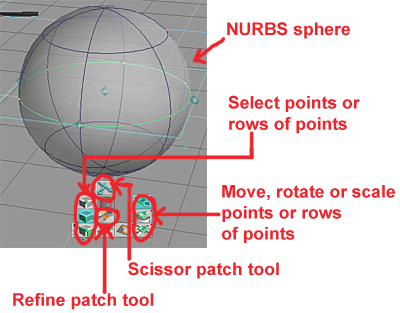
If your object is a NURBS object, then you can select rows
of points or points in the edit panel. You can then move, rotate, or scale these
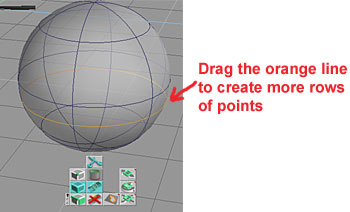
rows of points or points (Fig. 6.2). If you click on the Refine patch tool, the selected
row of points will turn orange. Click close to this line (be sure it stays
orange), and drag it where you want it: you'll get a new row of points (Fig.
6.3). You can
keep making new rows of points this way. When you're done adding new curves, just
left-click the Object Tool, or, if you want to keep editing your object, click
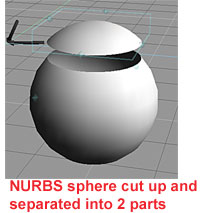
on another point or row of points you want to edit. You can also cut up a
NURBS object by using the Scissor patch tool. To do this, first select the tool,
then click on the row of points where you want to slice up your object. Now your
object will be sliced into two (Fig. 6.4).
|
 |
 |
 |
|
Fig. 6.2 |
Fig.
6.3 |
Fig. 6.4 |
|
