| 8. Textures
|
|
Layers
You can have several layers in your Material Editor. To make a new layer,
right-click inside the preview window and select "Add new layer". As
you can see from the pop-up list, by right-clicking on the preview window
you can also choose "Destroy layer" (if you want to get rid of that
particular layer), "Duplicate layer" (if you want to make a copy of
the layer selected), and "Reset all" (this makes the Material Editor
go back to the default). (Fig. 8.20)
|
|
 |
|
Fig. 8.20
|
| If you have more than one layer in the Material Editor, you can choose which
layer you want to work on by clicking on the little eye icon corresponding to
that particular layer. Also, if you have more than one layer, you can set how
transparent the color, bump and reflectance shaders/maps will be above the base
layer. (Fig. 8.21)
|
|
|
|
|
Fig. 8.21 |
Fig. 8.22
|
|
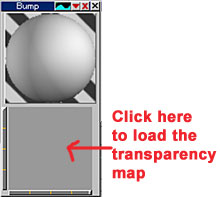
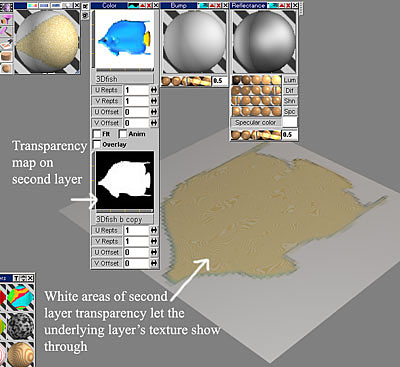
Transparency Maps on Layers
For the color, bump and reflectance channels above the base layer you
can also load a transparency map. Just click on the transparency button
in the top of these windows and choose the "mask alpha"
option, then choose the transparency map. (Fig. 8.22) However,
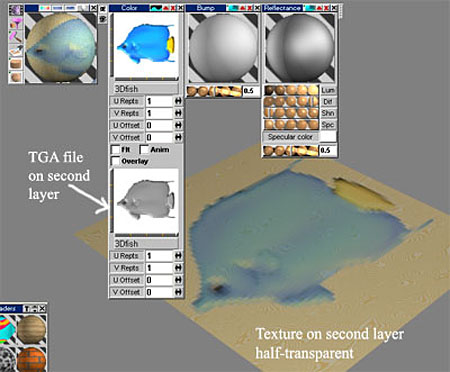
you have to keep in mind that on this second layer and on
subsequent layers the transparency maps behave differently:
1. If you use a TGA file for the transparency map, then on the
second layer's transparency solid areas will now be marked by gray
colors, not white. So those areas will actually be semi-transparent,
i.e. the underlying layer's texture will show through somewhat (Fig.
8.23).
|
|
|
|
Figure 8.23
|
|
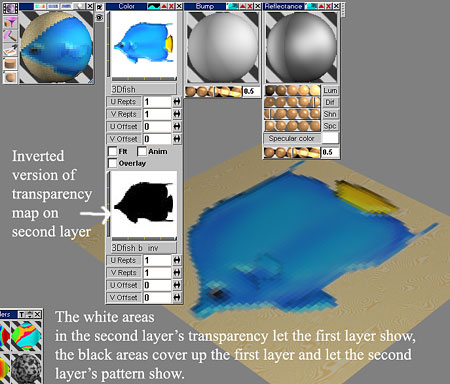
2. If you use an other image file format (e.g. JPEG, BMP, etc.), then in
the second layer's transparency map the
black areas will be solid and the white areas will be transparent, i.e. the white areas will let
the 1st layer come through and the black areas will show the texture on this new
layer and cover up the texture on the 1st layer (Figure 8.24).
|
|
|
|
Figure 8.24
|
|
So if you have
several layers in your texture and you use transparency maps on the layers above
the 1st layer, or if you want to use transparency maps for the
bump and/or reflectance channels, then you might want to make an inverted version of
your transparency map, too (Figure 8.25).
|
|
|
|
Figure 8.25
|
|
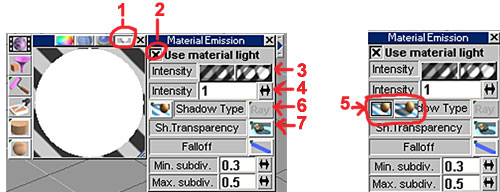
Light emitting textures (tS6 only)
In trueSpace 6, you can turn your object into a light source. To do
this, click on the little light bulb in the top bar of the Material Editor's
preview window (1). This will bring up the Material Emission panel. Check the
"Use material light" option (2) and voila, your object will emit
light.
Set the intensity with the slider (3) or numerically (4). To enable shadow-casting,
click on the little window underneath the intensity controllers on the left and
drag to the little icon of the sphere casting a shadow (5). To the right of the
words "Shadow Type", you can choose whether you want raycast or
mapped shadows (6). Raycast shadows are sharper and more accurate, but lake
longer to render. Under the shadow type, you can also set the shadow
transparency (7). If you have an object that has a transparency shader or map
applied to it and you want this object to have accurate shadows (i.e. the light
to pass through the transparent parts), then use transparent shadows. (Fig.
8.26)
|
|
 |
|
|
Fig. 8.26 |
Fig. 8.27 |
|
If you want to make the light more intensive, select your object and click on "Flip all normals of object"
(Fig. 8.27).
But, if you use raycast shadows, flipping the faces will make the rendering time
much longer.
The light emitting texture can be applied to the whole object, or only to
selected faces. To apply it to the whole object, click on the funnel shape in
the Material Editor. To apply it to only one of more faces, first select the
face, then click on "Paint Face". (Fig. 8.28)
|
|
 |
|
Fig. 8.28 |
|
Animated textures
You can put an animated texture on your object, too:
1. To animate your material, click on the material animation icon (the
icon in the top left corner that looks like a film cell). This opens up the material animation controls on top of the preview window.
2. Load your material.
3. Click the record keyframe icon (red circle) at frame 0.
4. Select the frame where you want to create the next keyframe (you can
either enter it manually in the little text box or use the spinner control to
advance to that frame).
5. Load the new material or edit the original one.
6. Click the record keyframe button to create the new keyframe.
7. Keep doing this until you have all the keyframes and materials/material
settings you want, then apply the animated texture to your object by clicking on
the Paint Object icon on the left side (the funnel shape). (Fig. 8.29)
|
|
 |
|
Fig. 8.29 |
| If you select the different keyframes in the
Keyframe/Scene Editor, then
render your object, you can see that, depending on the keyframe, the object
displays different textures. If you want to make an animation and see the
texture change, select "Render Scene to File", and save it as an .avi
file. Don't forget to select "All Frames" or set the beginning and end
of the animation you want to save into file. |
|
